How To Make A Hula Hoop Stand
How to make a hula hoop stand - The art of embroidery started hundreds of years ago. Early examples can be discovered all over the world. There's historic embroidery from Egypt, Northern Europe and China. Where and the way it really started will stay a thriller. What we do know is that in Europe, embroidery was a standing symbol. Using a needle and thread with a purpose to sew patterns on material was an indication of wealth and prosperity. It was thought of a girl's work. Many royal and noble girls spent hours embroidering. They embroidered everything, from tapestries to coats. These wealthy and powerful ladies had been usually depicted in portraits with their embroidery frame or different instruments used for the craft. Many other cultures share Europe's use of embroidery as marking wealth and status. Persia, India, Japan and China even have richly embroidered materials. These have been celebrated material and those who made them had been artisans of high caliber.
There are two primary methods to save a stabilizer. The first is thru pre-planning, hooping your stabilizer a little bit differently than ordinary, and the second is utilizing leftover scraps of stabilizer after it has been used for embroidery. How you narrow and hoop your stabilizer can prolong the variety of embroideries you can sew out, saving you money. When chopping your authentic piece of either cut away or tear away to place in your hoop, cut it the dimensions you want in one dimension, either length or width, however much longer in the different dimension. As an example, if you are chopping an 8-inch broad piece for a 4x4 hoop, it's possible you'll lower the stabilizer 8" x 24". Embroider the primary design at one finish. After neatly cutting or tearing the stabilizer away from the finished design, re-hoop on the identical end on your next design, starting simply past the torn section. You may must press the stabilizer using a dry iron on low temperature in between hoopings if it is wrinkled. Now you can reuse extra of the stabilizer, possibly having the ability to stitch out four (4) embroideries, depending on their dimension, from the one piece, instead of the three (3) embroideries you'll get by cutting three items 8"x8". Take this concept to the acute, and do not minimize your size off at all. Hoop your stabilizer, leaving the roll connected toward the highest of the ring. Place the roll behind the machine, out of the best way of the ring, embroidery arm, or any threads. After the embroidery is full, tear the stabilizer away, press the wrinkles out, and hoop again at the forefront.
I would suggest having a second person to help attaching the hula hoop to the blocks. This diy cake stand can be made with any patterned paper and mod podge.

Diy Dollar Tree Affordable Hula Hoop Cake Stand Easy Fast Cheap Youtube Dollar Tree Diy Diy Cake Stand Diy Wedding Cake Stand
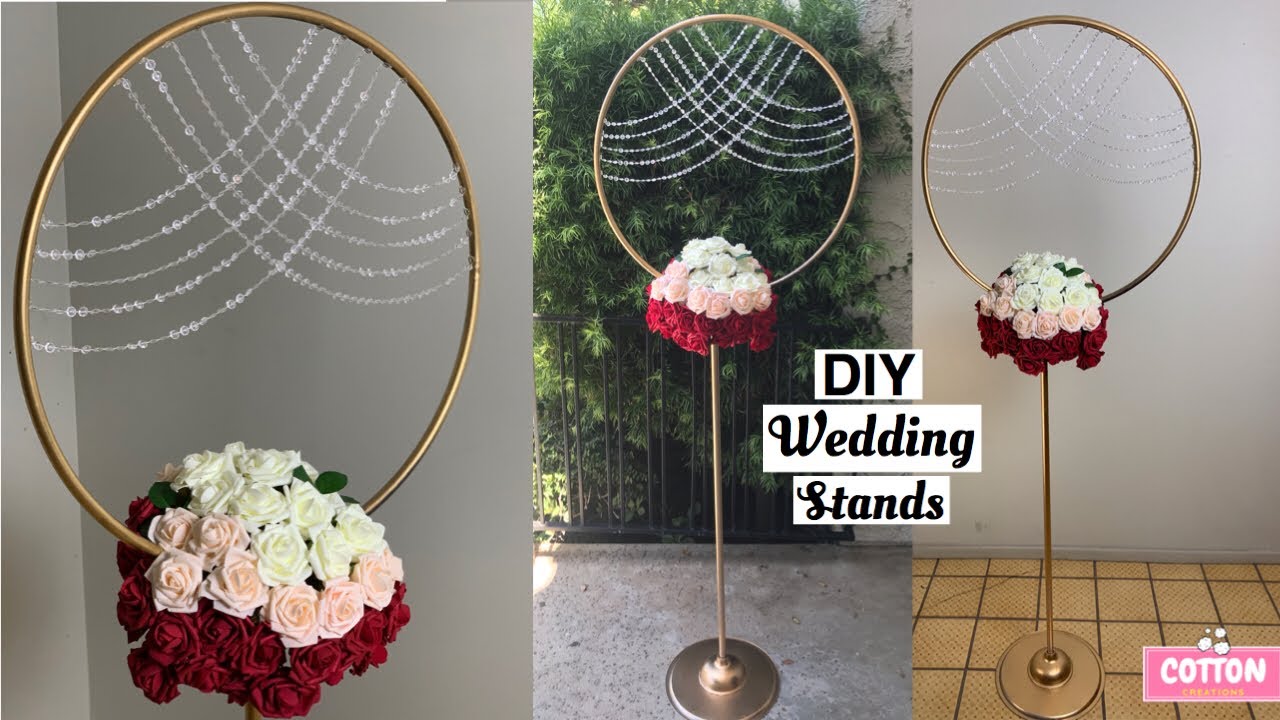
I stood the hoop up on its end and placed the 21 inch pieces of lumber on either side.

How to make a hula hoop stand. Then run a thick bead of hot glue along the top of the lid and press in the center of the foam board. You need lots of flowers for sure. 28 Rose Gold Metal Floral Hoop Wreath Hanging Rings.
Begin by selecting the circumference of your hula hoop. Hula Hoop Cake Stand Weddings Do It Yourself Wedding Forums. Join us this week as we create this Awesome wedding centerpiece using a Dollar Tree Hula Hoop.
1 Hula Hoop Wedding Hack How To Make A Chandelier Wedding. Once everything was spray painted I put it all together. Who has done a hula hoop cake stand.
You will be amazed how easy this project is. Turn the hula hoop into a memory bank by displaying all of your favorite photos into it. Diy dollar tree hula hoops and pool noodles decor diy floral hoop cake stand diy wedding decor noozay decor.
Get out your rivets and riveter insert the rivets and crank away until the rivet pops into place. Probably more than you think. Use a hot glue gun to keep the hoops in place or they will slip.
Diy metal halide aquarium lighting. This is such an amazing alternative frame that will become a focal point in a minute. Tools needed to make your own hula hoop.
Hoopcakestand solawoodflowers weddngdiy How to create a metal hoop wedding cake stand and decorate it with sola wood flowers. How do you see the funny DIY Hula Hoop Projects above. Using simple and cheap materials like hula hoop.
Diy Cake Stand With Hula Hoop How To Make A Hula Hoop Cake Stand diy metal halide aquarium lighting. Make sure you keep some pressure on the rivet as. Create the Base.
How To Make A Hula Hoop Stand Up Good Tutorial How To Make A Hula Hoop Stand Up. I just bought two floral blocks from dollar tree cut out a place for the hula hoop to sit inside. Lets get crafty with this super fun super affordable hula hoop cake stand tutorial.
Hoop Cake Stand For Hire In Ol9 Oldham For 30 00 For Sale Shpock. This easy DIY project is perfect for creating a wedding day centerpiece. Then I drilled two holes on the outside of the hoop one on each side of the seam line in order to secure the hoop together.
This was NOT the easiest DIY. This part is easier if you have a second set of hands but I managed to do it myself and Im sure you can as well.

Diy Hula Hoop Balloon Arch Balloons Balloon Stands Diy Table Top

Diy Dollar Tree Hula Hoops Cake Stand Video Diy Wedding Decorations Diy Party Decorations Diy Wedding

Cake Hoop Etsy Au In 2021 Wedding Hoop Wedding Cake Display Wedding Cake Table

Hula Hoop Cake Stand Hula Hoop Baby Shower Wreath Hoola Hoop

Diy Dollar Tree Hula Hoops And Pool Noodles Decor Diy Floral Hoop Cake Stand D Diy Wedding Decorations Dollar Tree Diy Wedding Bridal Shower Centerpieces Diy

Pin On Balloons

Diy Hula Hoop Picture Frame With Stand Wedding Photo Weddingpictures Hulahoop Flowers Stand Easel B Wedding Frames Diy Photo Frames Diy Picture Frames

Wedding Hoop Cake Stand Cake Stand Cupcake Stand Hula Hoop Etsy Canasta Decorada Para Boda Centros De Mesa Para Boda Mesas De Boda
Diy Dollar Tree Hula Hoop Balloon Cake Stand Diy Dollar Tree Hula Hoop Cen Party Decorations Diy Dollar Tree Diy Dollar Tree Centerpieces Dollar Tree Birthday

Turn Heads With This Hula Hoop Cake Stand Hula Hoop Copper Diy Diy For Girls

Hula Hoop Cake Stand Diy Wedding Backdrop Traditional Wedding Decor Chandelier Diy Crystal
Diy Wedding Hula Hoop Stand Dollar Tree Wedding Decorations Backdrop Stand Youtube Dollar Tree Wedding Dollar Tree Wedding Decorations Diy Wedding Arch

Hula Hoop Turned Centerpiece Wedding Hoop Wedding Table Centerpieces Wedding Centerpieces

1 Hula Hoop Wedding Hack Wie Man Einen Kronleuchter Wedding Centerpiece Macht Centerpiece Einen H Idees De Mariage Arbres De Mariage Decoration Mariage
I'd like to provide you some ideas for hooping satin jackets for machine embroidery. We do not want topping for satin jackets as a result of it is a steady cloth, in contrast to sport shirts and t-shirts that are knits and stretchy. Hooping satin jackets is among the trickiest little jobs for the new embroiderer to master. The design placement on the jacket back should be excellent - not too low or high - and it must be straight. For placement, one rule of thumb is to place the underside of the lettering (if utilizing an arc, measure for the letter at the prime of the arc) seven inches down from the collar seam. Another is to position the design's middle at roughly 9 or 10 inches down from the collar seam. (This is just a guideline. If it is advisable, get a sewout of the design or photocopy the actual size and lay it on the jacket to find out the perfect placement.) To get the design straight, lay the jacket flat and easy, and using clothespins, connect a yardstick under every sleeve where the seams come together. Draw a line with tailor's chalk or soap for the horizontal placement. Make a halfway mark on this line to indicate the center. Be sure to double-check these measurements along with your eye - jacket making is just not an actual science and sometimes you need to modify a method or one other to make up for discrepancies in measurements.
Janome designed the Reminiscence Craft 9700 to carry together all the most effective options into one stitching machine. The MC9700 has the ability and precision of a superior stitch mechanism mixed with the sophistication of computerized management. You get the precision stitching Janome is thought for along with straightforward navigation and design layout on a colour touch display screen. The Reminiscence craft 9700 can convert from a stitching machine into an embroidery machine in seconds. Not like other manufacturers that require separate attachments and quite a few steps the 9700 has a built-in, two-step conversion. Simply touch the embroidery mode key then attach the embroidery foot and one minute it's a sewing and quilting machine the next an embroidery machine.
Deanne Blackhurst is a freelance author for Dee's Crimson Works, a web based site that specializes in Redwork and Cross Sew patterns. Utilizing the standard redwork fashion as inspiration, these new patterns are fairly priced and have a enjoyable classic really feel but with a recent perspective. At Dee's Pink Works you can find basic sets that characteristic the Days of the Week and charming Sun Bonnet Ladies in addition to the extra current Cheese and Wine collection and Celtic Knots. They also carry thread and notions particularly designed for redwork and cross stitch. Go to them at Dee's Crimson Work Inc [http://www.dsredwork.com] and discover a sample you possibly can't resist.


Comments
Post a Comment